A shaded roof shouldn’t keep you from going solar, and neither should a contractor’s markup. A ground mount solar system DIY build follows a clear path: choose racking, lay out the site, set foundations, permit, trench to the house, and commission. With usable land and a complete kit, a hands-on homeowner can build a ground mounted solar panel array from scratch. This guide walks through every stage.
When Does a Ground Mount Make More Sense Than a Roof Installation?
A ground mount makes more sense when your roof is shaded, poorly oriented, too small, or due for replacement, and you have open, sunny land within a practical trenching distance of the house. If that describes your property, you’re in the right place.
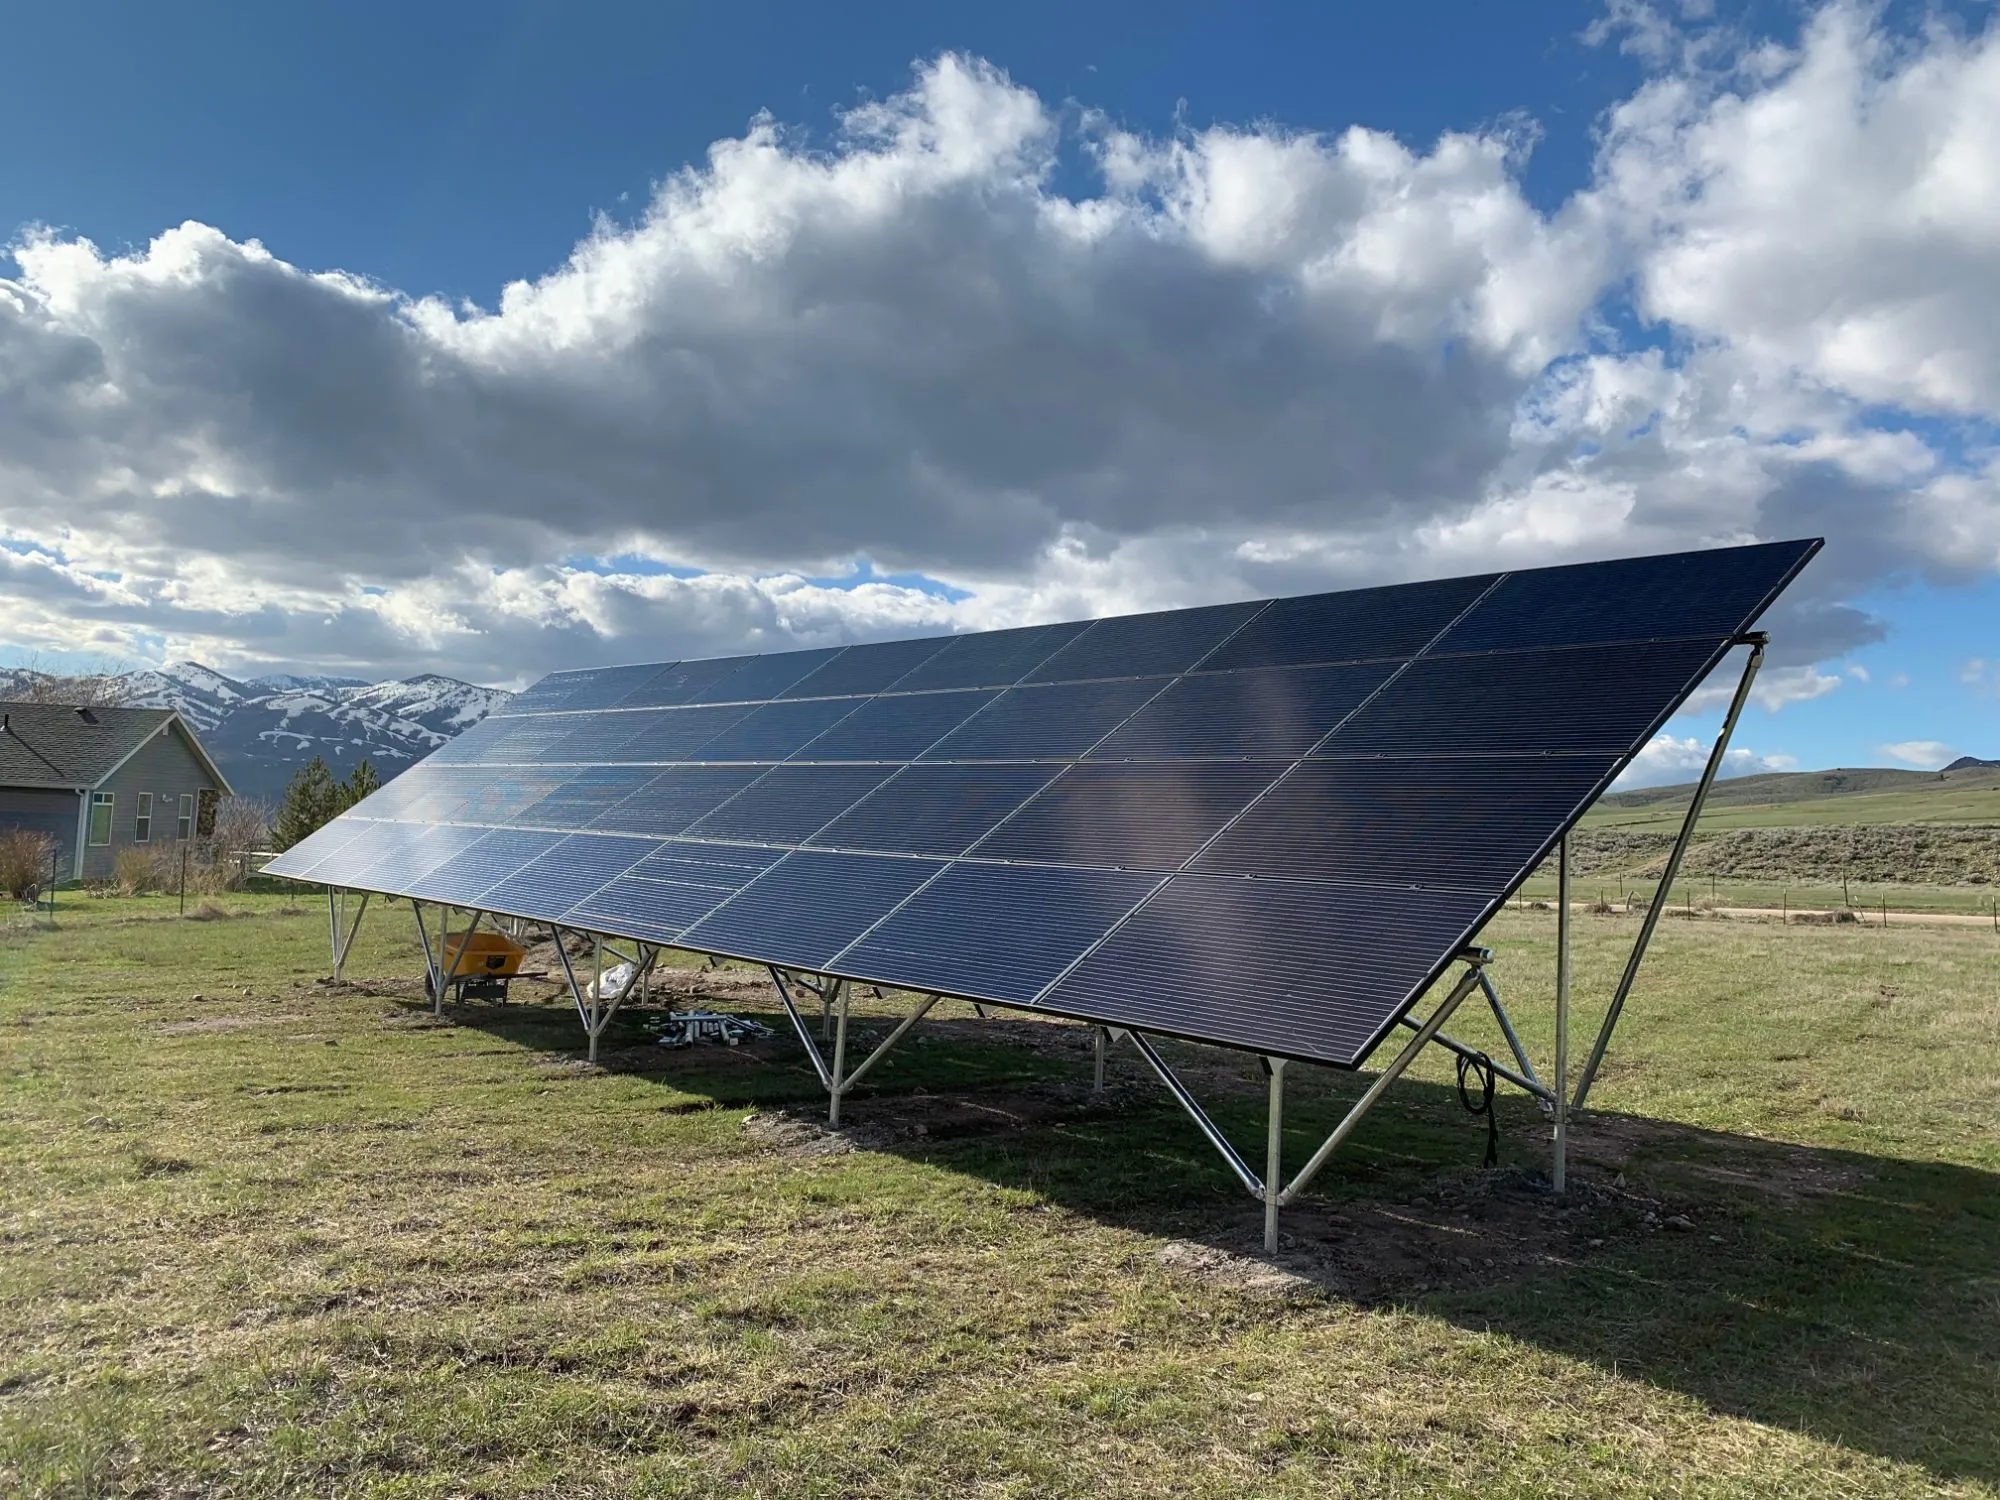
Ground mounted solar panels solve problems a roof can’t. You set the exact azimuth (the compass direction the panels face) and tilt, instead of accepting whatever your roof pitch gives you. You can reach every module from the ground for cleaning, snow clearing, and inspection, and you never drill a hole through your roofing.
The trade-off is more site work. You’ll set foundations, run an underground circuit, and satisfy zoning rules that rooftop arrays avoid. All of it is within reach of a careful homeowner who plans ahead.
Property conditions that favor a solar system on the ground:
- Trees, chimneys, or neighboring buildings shade the roof for much of the day
- The roof faces east, west, or north with little usable south-facing area
- The roofing is aging or scheduled for replacement
- You have open land with a clear view of the southern sky
- You want room to add panels later
Still weighing ground mount vs roof mount solar? Our DIY solar guide for your home covers that decision in depth. Everything below assumes you’ve chosen the ground.
What Types of Ground Mount Solar Racking Can a DIYer Install?
Fixed-tilt racking is the most DIY-friendly solar ground mount racking for most homeowners. Pole mounts suit smaller arrays on tight or uneven sites, while trackers add motors and moving parts that push complexity well beyond a typical homeowner build.
Here’s how the three configurations compare:
| Racking type | How it works | DIY difficulty | Best fit | Main trade-offs |
|---|---|---|---|---|
| Fixed tilt (post and rail) | Rows of vertical posts support angled cross members and rails; panels clamp to the rails at a set angle | Lowest: repetitive, mostly hand-tool work once posts are in | Most residential arrays; scales easily | More posts to set; tilt is fixed at installation |
| Pole mount | A single large-diameter steel pipe in a concrete footing supports a rack on top; some designs allow seasonal tilt adjustment | Moderate: the heavy pole and footing mean lifting the assembled rack takes extra hands or equipment | Small arrays, sloped lots, heavy-snow areas where extra ground clearance helps | Large single footing; limited array size per pole |
| Trackers (single-axis or dual-axis) | Frames rotate to follow the sun using motors, controllers, and bearings | Highest: more foundation engineering, more wiring, ongoing mechanical maintenance | Experienced builders comfortable servicing moving equipment | Added complexity and maintenance of moving parts |
For a first solar panel ground mounting system, fixed tilt gives you the best balance of simplicity, flexibility, and inspection familiarity, since it is the ground mount design building departments review most often.
Whichever style you pick, the racking manufacturer’s engineering documentation governs post spacing, footing specifications, and allowable wind and snow loads for your site. That documentation also becomes part of your permit package. To see how rails, clamps, and mounting components fit together, read a beginner’s guide to solar hardware, then contact Solar Wholesale to learn more about the ground mount racking options available with its kits.
How Do You Choose the Best Location and Orientation for a Ground Array?
The best location is an open, unshaded spot facing true south (in the Northern Hemisphere) on stable, well-drained ground, as close to your electrical panel as setbacks allow. Tilt and azimuth are then tuned to your latitude and production goals.
A compass points to magnetic south, not true south, and the gap between them (magnetic declination) varies across the country. A common DIY mistake is staking the array from an uncorrected compass reading. Use a declination-corrected compass or a mapping app set to true north before you stake anything.
For tilt, a common starting point for year-round production is an angle close to your latitude. Steeper angles favor winter output and shed snow faster, while shallower angles favor summer. The free NREL PVWatts calculator lets you model different tilt and azimuth combinations for your exact address before you commit.
Site-Selection Checklist
- Azimuth: Aim at true south, correcting for magnetic declination.
- Tilt: Confirm your racking’s adjustment range, then model options in PVWatts.
- Shading: Check the sun path in winter, when the sun sits lowest. Account for trees that will grow taller.
- Distance to the house: Shorter runs mean less trenching and smaller conductors.
- Setbacks and easements: Check property line setbacks with your local zoning office and any recorded utility or drainage easements on your plat.
- Ground conditions: Note slope, drainage, standing water, rock, and clay.
- Access and clearance: Leave room for mowing, snow sliding off the panels, and maintenance.
- Underground utilities: Contact 811 before digging. The national 811 call-before-you-dig service notifies public utilities to mark their lines. It does not mark private lines like septic systems, wells, irrigation, or buried power to outbuildings, so locate those yourself. Confirm any local trenching rules, along with the locally adopted code edition and amendments, with your AHJ.
Which Foundation Is Best for Ground Mounted Solar Panels?
The best foundation depends on your soil, frost conditions, and racking engineering. Concrete footings work in the widest range of soils and are the most accessible for DIYers, driven posts are fast where soil allows, and ballasted systems suit sites where digging isn’t an option.
Concrete Footings
You auger holes, set steel posts plumb, and pour concrete around them. With a rented power auger and a few helpers, this is squarely DIY territory. Frost matters here: in cold climates, footings must extend below the frost line so freeze-thaw cycles don’t heave the array out of alignment. Your racking documentation and local code set the required depth and diameter.
Driven Posts and Ground Screws
Steel posts are hammered into the soil, or helical ground screws are spun in, with no concrete. Installation is quick and there’s no cure time.
Success depends heavily on soil. Dense rock stops posts cold, while loose sand reduces holding strength. Many jurisdictions and racking engineers expect pull-out testing to confirm capacity, and the driving equipment usually has to be rented.
Ballasted Systems
Ballasted racking sits on the surface and relies on heavy concrete blocks or ballast trays to resist wind uplift. It avoids digging entirely, which helps on shallow bedrock or sites where penetrations are restricted. The trade-off is sheer weight to move and place.
Soil type drives the decision more than preference does. Expansive clay, high water tables, rocky ground, and deep frost all change what your racking engineer will allow. A simple test hole dug before you order tells you a lot about what’s under your lawn. Imagine a property where the yard looks uniform, but a test hole hits rock a short way down: that single finding changes which foundation makes sense, and it’s far better to learn it before the equipment arrives.
Do You Need a Permit for a Ground Mount Solar System?
Yes. A ground mount solar permit typically involves a building permit, an electrical permit, and zoning review, plus utility interconnection approval for grid-tied systems. The zoning and structural layers are what make ground mounts different from roof installations.
Your AHJ (authority having jurisdiction) is the local office that reviews your plans and inspects the work, usually a city or county building department. Rooftop permits focus on roof structure and fire access. Ground mount permits shift the focus to land use and foundations.
The layers you’ll typically work through:
- Zoning: Many jurisdictions treat a ground array as an accessory structure. Expect rules on setbacks, height, and sometimes front-yard placement or lot coverage.
- Building/structural: Reviewers want foundation details matched to local wind, snow, and soil conditions. Racking manufacturers commonly publish engineering documentation for this purpose, and some AHJs require a stamped letter.
- Electrical: You’ll submit a single-line diagram showing modules, inverters, disconnects, conductor sizes, conduit, and the interconnection point. NEC Article 690 governs PV systems and Article 705 governs connection to your service.
- HOA: If you have one, get written approval before submitting.
- Utility interconnection: Grid-tied systems need an interconnection application and, later, permission to operate (PTO).
Your site plan should show the array footprint, distances to property lines and structures, and the trench route to the house.
Some jurisdictions restrict who is allowed to perform electrical or structural work. Confirm owner-builder permit eligibility with your local building department before you submit. Always verify which NEC edition your AHJ has adopted and any local amendments. For a broader look at the DIY solar process, see why you should install solar panels yourself and the common mistakes while self-installing DIY solar panels.
What Is the DIY Ground Mount Build Sequence From Layout to Commissioning?
A DIY ground mount solar installation runs in this order: design and permits, utility locates, layout, foundations, racking, trenching, modules, wiring, interconnection, and final inspection before energizing. Following this sequence keeps inspections on schedule and prevents rework.
- Finalize your design and bill of materials, then submit permits.
- Contact 811 and wait for utility marks. Flag private lines yourself.
- Lay out the array with stakes and string lines. Square the corners with a 3-4-5 triangle and check diagonals.
- Install foundations to the racking specifications. Let concrete cure per the manufacturer’s directions before loading it.
- Assemble racking, torquing every fastener to spec.
- Dig the trench, lay conduit, and schedule any required open-trench inspection before backfilling. Backfilling before that inspection is a common and costly mistake.
- Mount the modules and complete equipment grounding and bonding.
- Wire strings, junction boxes, inverters, and disconnects.
- Complete the interconnection at your service panel.
- Pass final inspection, receive utility PTO, then commission the system.
Commissioning means verifying polarity, measuring each string’s open-circuit voltage against your design values, confirming inverter startup, and checking monitoring. For grid-tied systems, never energize before PTO.
Treat this list as a planning overview. The racking manufacturer’s instructions handle the details, and the step-by-step solar journey roadmap shows where each task fits in your overall project.
Tool Checklist
- Stakes, string line, marking paint, and a long tape measure
- Laser level or transit
- Power auger (rental) or post driver for your foundation type
- Wheelbarrow or mixer for concrete
- Trencher or mini excavator (rental)
- Impact driver, socket set, and torque wrench
- Multimeter rated for your system’s DC voltage
- MC4 crimp and disconnect tools, wire strippers
- PVC cutter, primer and cement, fish tape
- Gloves, eye protection, and sturdy boots
How Do You Wire a Ground Mount Array Back to the House?
You run conductors in buried conduit from the array to the house, sized for the circuit’s current and the run’s distance, and buried to the minimum cover depth in NEC Table 300.5, verified against the code edition and local amendments your AHJ has adopted. Whether that run carries DC or AC depends on where your inverter sits.
A “home run” is the circuit that travels from the array back to your home’s electrical equipment. DIYers often mix up the two architectures, so here’s the distinction.
DC Home Run: String Inverter at the House
Module strings connect at the array, and DC conductors travel underground to a string inverter mounted on or near the house. Because strings operate at relatively high voltage and lower current, DC runs handle distance well. Once those conductors enter the building, rules for DC circuits inside structures apply, including the NEC 690.12 rapid shutdown requirements for PV circuits on or in buildings. Confirm how your AHJ applies them.
AC Home Run: Microinverters or an Inverter at the Array
Microinverters under each panel, or a string inverter mounted on the racking, convert power at the array. You then run AC conductors to the house, where they land at an AC disconnect and a breaker or supply-side connection under Article 705. This keeps DC out of the building entirely, though AC current adds up across the array, which affects conductor size.
Conduit, Depth, and Conductor Sizing
- Conduit: Schedule 40 PVC is common underground, with Schedule 80 PVC or rigid metal conduit where risers are exposed to damage.
- Depth: Table 300.5 sets minimum cover by wiring method and location. Rigid metal conduit generally allows shallower cover than PVC, and direct-burial cable requires the most. Check the table in the NEC edition your AHJ has adopted, along with any local amendments, before you dig.
- Conductors: Use wet-location-rated wire, size it for ampacity, then upsize as needed to control voltage drop over your distance.
- Grounding: Run an equipment grounding conductor with the circuit, and check Articles 690 and 250 for whether the array needs its own grounding electrode.
For the connection inside the house, see the DIY solar wiring overview.
What’s in a Complete DIY Ground Mount Solar Kit, and What Does It Cost?
A complete ground mount solar kit includes panels, an inverter system, mounting hardware, and the balance-of-system components. Solar Wholesale prices its kits at $1.50 to $1.95 per watt with a full bill of materials, covering the equipment side of everything in this guide.
Balance of system (BOS) means everything besides the panels and inverter: racking hardware, disconnects, wiring, connectors, and the other parts that make the system code-ready. Getting the full bill of materials up front helps you avoid surprise trips for missing parts halfway through your build.
Here’s the math at the supplied per-watt range:
- 5 kW system (5,000 watts): $7,500 to $9,750
- 8 kW system (8,000 watts): $12,000 to $15,600
- 10 kW system (10,000 watts): $15,000 to $19,500
Where your system lands in that range depends on panel selection, DC versus AC architecture, and racking configuration. Pricing changes, so confirm the current figure for your ground mount configuration by requesting a quote.
Why wholesale? Solar Wholesale sells direct from the distributor, with no sales-company or contractor markup layers between you and the equipment.
Solar Wholesale ships DIY kits and individual wholesale components across the entire United States, from single panels to full systems, and the DIY path is built around the resources in this guide.
Start by browsing the step-by-step solar journey roadmap to plan your build, then pair it with the permitting guidance above as you move forward.
Frequently Asked Questions
Can I install a ground mount solar system myself?
Yes, many homeowners successfully build their own ground mount arrays, especially with fixed-tilt racking and a complete kit that includes a full bill of materials. The work involves layout, setting foundations, assembling racking, trenching, and wiring, so you should be comfortable with tools, rented equipment, and following code requirements. Some jurisdictions limit who can perform electrical or structural work, so confirm owner-builder eligibility with your local building department before you start. If your area requires a licensed electrician for the final service connection, you can often still handle the site work and racking yourself.
How much does a DIY ground mount solar system cost?
A complete ground mount kit from Solar Wholesale runs $1.50 to $1.95 per watt, which works out to roughly $7,500 to $9,750 for a 5 kW system or $15,000 to $19,500 for a 10 kW system. That price covers panels, the inverter system, mounting hardware, and balance-of-system components. Your total project budget should also account for permit fees, concrete, conduit, and equipment rentals such as a power auger or trencher. Pricing changes over time, so request a current quote for your specific configuration.
Do ground mount solar panels need a permit?
Yes, nearly every jurisdiction requires permits for a ground mount array. You can typically expect a building permit, an electrical permit, and a zoning review, since many areas treat a ground array as an accessory structure subject to setback and height rules. Grid-tied systems also need an interconnection application and permission to operate from your utility before you energize. If you live in an HOA community, get written approval before you submit your permit package.
How deep do ground mount solar posts need to be?
There is no single required depth, because it depends on your racking manufacturer’s engineering, your soil type, and local wind and snow loads. In cold climates, concrete footings must extend below the local frost line so freeze-thaw cycles don’t heave the array out of alignment. Your racking documentation and local building code set the exact depth and diameter for your site. Digging a test hole before ordering helps you spot rock, clay, or water issues that could change your foundation plan.
How far can ground mount solar panels be from the house?
There is no fixed maximum distance, but longer runs mean more trenching, more conduit, and larger conductors to control voltage drop. DC home runs to a string inverter at the house generally handle distance well because they operate at higher voltage and lower current. AC home runs from microinverters add up current across the array, which can push you toward heavier wire over long distances. Your placement is also limited by property line setbacks, easements, and where you can find open, unshaded ground.
Are ground mount solar panels more efficient than roof mounts?
The panels themselves have the same efficiency rating whether they sit on a roof or on the ground. However, ground mounts often produce more energy because you can set the ideal tilt and face true south instead of accepting your roof’s pitch and orientation. Open airflow behind ground-mounted panels also helps them run cooler, and solar panels generally perform better at lower temperatures. You can model the expected output difference for your address using the free NREL PVWatts calculator.
What is the best racking for a DIY ground mount solar array?
Fixed-tilt post-and-rail racking is the best choice for most DIY builders because the work is repetitive, uses mostly hand tools, and scales easily as you add panels. It is also the ground mount design building departments review most often, which can simplify inspections. Pole mounts are a good alternative for small arrays on sloped or tight sites, though lifting the assembled rack takes extra help or equipment. Trackers add motors and moving parts that make them better suited to experienced builders comfortable with ongoing mechanical maintenance.